AutoCAD vs Revit | What's the Difference?
We compare Autodesk's software Revit and AutoCAD. Which one should you choose and can they be used together? Click here to read more about AutoCAD vs Revit.

Starting to use a new software can be overwhelming, and when entering the world of CAD applications, parametric software can be a real challenge, especially when you have no idea how to develop your design. In the past I have used a variety of different types of 3D parametric software and Inventor is one of my favourites.

I would like to take just 5 minutes of your time to suggest a few tips that will help you to develop your ideas and make you feel comfortable using this software, so you don’t see the product as a barrier when communicating your design intent but instead, as a tool that can help you.
Talking with my colleagues I asked them, if they could give just one tip to beginners, what would it be? Taking their answers into consideration, as well as a few of my own, I have put together a list of essential Tips and Tricks to help you improve the way you use Inventor, and become more efficient in your daily activities.
When you are starting your model, you want to make sure that you are using the correct units, if you are in the middle of developing your design, it can be very frustrating to find out you are working in inches when you don’t want to be. To avoid this, you can set the Default Template to use millimeters or inches, and also set the default standard, for example ISO or ANSI just to mention some.
How can you set the default template?
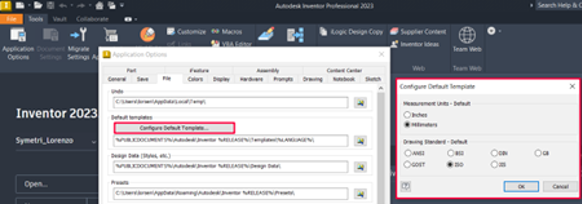
This is very simple. From the Home page, select Application Options from the Tools tab, there you will see a dialog box , go to the File tab and select Configure Default Template. From there you can set your preferences, just overwrite the default template to save your choices, apply and close the Application Options. And that’s done! Now you never have to worry if you are working with the correct units anymore.
 Users come from a variety of backgrounds and can be used to using other software commands. This means when using Inventor they might find hard to orbit or zoom. If this happens to you, I want to reassure you that this is totally fine, it happens to me all the time when using a new application.
Within Autodesk software’s there is a kind of guideline, you can find a few common features in different applications; AutoCAD, Inventor, 3DS Max and so on. One of these features is the View Cube, which is a small cube on the top right corner. This feature will help you in almost every Autodesk software to orientate your work, give it a go!
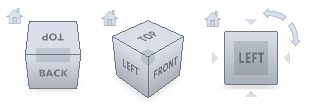
At the beginning it is always good practice to keep an eye on it and see how you are orbiting around your model – the view cube follows your moves! You can also use the view cube itself to orbit or to set an orthographic view, front, top or side or however, you want to orientate
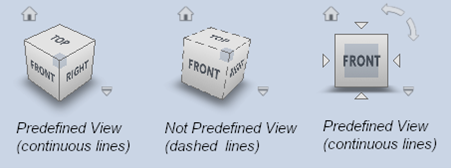
While on a predefined view, the edges of the cube are made with a continuous line, but when not in a predefined view, the edges are dashed lines. This helps you understand if you are looking at your model in one of the predefined views or not. You can also reset the home or the Front/Top views to be in a different point of your model.
Now that you are inside Inventor, let’s suppose that you are creating a part, every time you right-click with your mouse inside the graphics area, a strange shortcut menu appears like the one pictured below.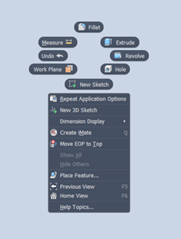
This is a Marking Menu and it changes for every environment. This means that when you are using the Sketch feature, you will have a marking menu related to the Sketch environment, and so on with other environments. This is a great feature to get used to as it means you have commands at the click of your mouse.
The marking menu can also be customised, you can add ad remove commands however you like and change the position of the buttons. There is no need to rush this though, as you become more accustomed to using the software, you can change it to fully meet your needs.
Since we were talking about the sketch environment, let’s take a look at this handy option that can help you to save time with your design.
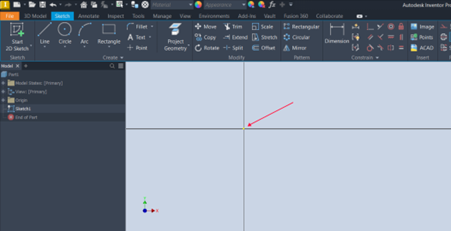
When you start a new sketch you might notice it asks for a plane to place your sketch on and then puts you straight inside the sketch environment. That is where I want to have something automatically placed inside my empty sketch, I want to have the origin point captured so that I can use it do develop my geometries, place dimensions from it, constrain on it and so on.
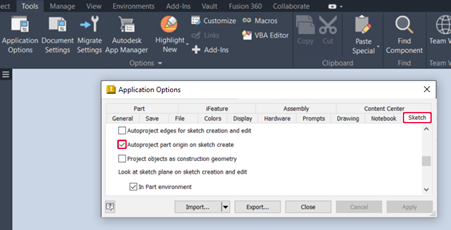
If this is not on by default, you can turn it on from the application options (Tools tab), just check the box that says ‘Autoproject part origin on sketch create’ (Sketch tab inside the dialogue box).
Not too bad at all, now I have a reference point!
Staying inside the sketch environment, I want to give you this tip to help you understand the lines you are drawing, where they can move on the plane… the so-called ‘degrees of freedom’ of those lines.
When I started using Inventor for the first time, I found this incredibly helpful and it made me feel much more comfortable because I could actually see where I was missing something, and why my geometries weren’t in a fixed position in my sketch.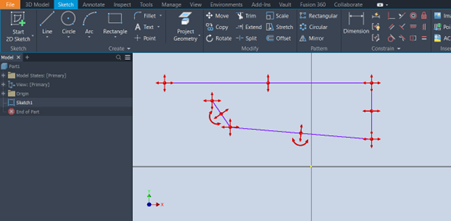
It’s very simple to activate this, just right-click inside the graphic window (marking menu) and select if you want to Show or Hide the degrees of freedom. On the screen, big red arrows will appear to highlight exactly where those lines are free to move.
This will prepare you for the next step, to constrain your geometry, and how to make those lines not free to move anymore.
One big advantage of a parametric software is that you can go back in your browser (tree) and modify old features, and your whole model will be modified automatically. This is because those old features were like fathers of the other new features. That is simply what a parametric software can do.
It is easy to understand that if you try to modify something that is messy or has made quickly without any dimensions, it can be very difficult. Imagine if this was to happen after weeks… or months!!
For this reason, it’s a good thing to keep your model as tidy as possible. One of the main features of parametric software is the sketch, and this has to be as efficient as possible. Some good advice is to keep your sketch simple, without too many geometries inside, and to make your geometry fully constrained.
This advice is echoed from my previous point while talking about the degrees of freedom. To avoid those degrees you should constrain your model, with geometrical or dimensional constraints, and keep your sketch easy to read and modify.
 Launching the line tool, you see that you can create lines – surprising news! - but if you left click, then hold and drag your mouse after you had placed the first point, you will notice that the line is no longer a line, but an arc. You can draw an arc while staying inside the line tool. This is incredibly handy if you want to draw slots or different geometries that you have in mind
 Another good tip, is to infer a tangent constraint from the circle, you can launch the line tool, left click, hold and drag the cursor from the circumference of the circle and voila, you have the line tangent to that circle.
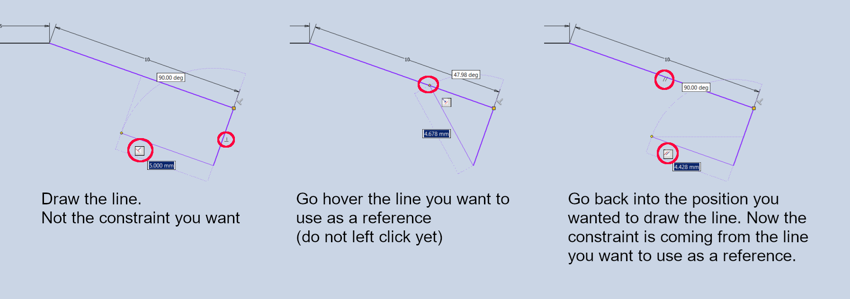
One thing many people don’t realise is that by just going over another line, you can infer a constraint from that object. For example, if you want to draw a line parallel to another line, hover your cursor over the line you want to use as a reference and just like that, you can deduce the constraint that could come from that. This is very useful to quickly constrain your geometry while you draw your lines.
These two keyboard keys can become your best friends if you want to draw faster. By pressing and holding CTRL, you can turn off any snap if you want to avoid them for any reason. With this you can also avoid the inferred trim, for example, when trying to trim an object, see the picture below to make this clearer.

With the SHIFT instead you can turn the trim command into extend, and vice versa, this same feature is in AutoCAD. You don’t have to launch the other command, you can just toggle between them pressing SHIFT from your keyboard.
Sometimes your memory can play tricks on you and for some reason you just don’t remember one of the commands or how to use it, does this ever happen to you? It is totally normal considering we all have multiple tasks to complete and different things to keep in mind.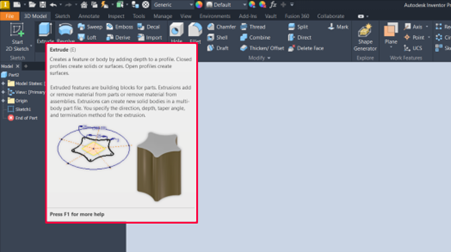
To help you on this there is the ‘hover tooltip’. It is very simple, just hover over a tool, stay there a few seconds and like magic, a short tip will appear to remind you and help you understand what that tool does. Pretty handy!
You can also change the timing of this tooltip to show...but that is for another post maybe.
Thank you very much for taking the time to read this post, I hope you found something helpful that you didn’t already know or something that can make your work life easier. I hope I have given you a different point of view because I know that when it comes to learning new applications, even the easiest things can be challenging.
Let me know what you think, if you have any questions feel free to contact me, and why not join one of our upcoming online course sessions? We provide private as well as on-site training directly at your office with courses related to your job requirements.
Thank you and until next time!

We compare Autodesk's software Revit and AutoCAD. Which one should you choose and can they be used together? Click here to read more about AutoCAD vs Revit.
Discover what Product Data Management (PDM) is, its benefits, key features, and how PDM systems streamline data management across industries.
Learn all about IFC files in BIM: their purpose, benefits, formats, and how they enable seamless collaboration in construction projects with open standards.
